Showing posts with label Nail-aid 3 minute artificals. Show all posts

Monday, April 22, 2013

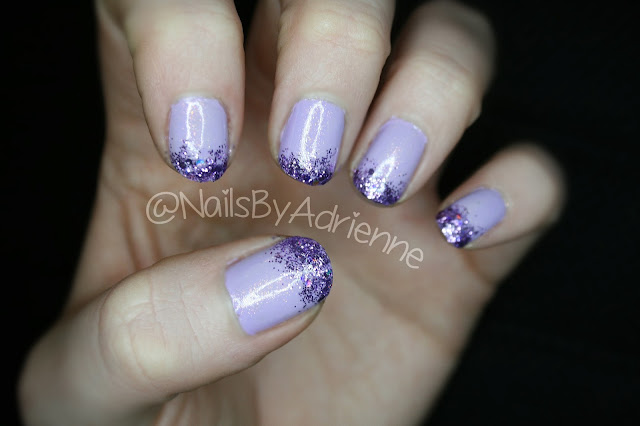
NOTD: Purple Gradient Nails

Happy Monday, everyone! I know Monday isn't everyone's favorite day of the week. So, I'm trying to do my part to make your Monday a little bit better with a new blog post. Today's post is a NOTD(nails of the day). I was feeling a little lazy when I did these, so they are pretty simple. It's a purple gradient glitter. I hope you like them, and give them a shot. I have a tutorial on gradient glitter nails already, if you want to check it out. When I have a working video camera, I will do a video tutorial on them, as well. I hope your Monday is going well, and find this post as a little break from the Monday blues. Don't forget to like me on Facebook if you want to see what I'm up to. Follow me on Instagram for lots of pictures from my life.
Have a blessed Monday,


Products used:
Base coat: 3 Minute Artificials
Light Purple: Sally Hansen, Lacey Lilac 
Sheer Glitter: Revlon Sweet Nothings, Satin Sheets
Chunky Purple glitter: Pure Ice, Darkside
Top coat: Sally Hansen, Insta Dry
1 Cosmetic Wedge Sponge
__________________________________________________


I started by painting my nails with a base coat. Next, I painted them in a light purple. When that dried, I painted a thin coat of a sheer fine glitter. The sheer fine glitter helps the gradient effect look like it carries all the way down the nail. Then, I used the cosmetic wedge to sponge the purple glitter onto the tips of my nails. I let that dry, and used my current favorite top coat. Lastly, I used a paint brush dipped in nail polish remover to clean up any nail polish that got on my skin.

__________________________________________________


Wednesday, April 17, 2013

Neon Pink and White stripes, Nail Tutorial

Hello everyone! I'm happy to bring you another nail tutorial this morning! Today's tutorial is so simple, I think anyone could do it. So, let's get into it!


If you want to see how I created this design, keep reading!

Products used:
Base coat: Nail-aid, 3 minute artificials
Neon Pink: L.A. Colors, Pink bubbles
Bright Pink glitter: Sinful colors, Pinky Glitter 
White striper: Art Deco, White
Silver glitter striper: Silver glitter
Top coat: Sally Hansen, Insta dry

__________________________________________________


Step 1: Like always, start with clean dry nails, and apply your favorite base coat. Base coats, keep your nail polish from staining your nails, and also help prevent chipping. Don't forget, to go along your nails free edge with every coat of polish you apply. The free edge is the very tip of your nail. This also helps keep your nail polish from chipping.

Step 2: Pick any color of your choice, I chose a neon pink. Pick 1 or 2 nails that you want to be your accent nails. Then on the accent nails, paint the entire nail. Next, just paint the tips of all the other nails. Wait for your nails to dry for a couple minutes before you move on to the next step.

                       Don't forget your free edge :-)
__________________________________________________


Step 3: Pink a glitter polish that coordinates with the color you picked. I used a bright pink glitter. Paint you accent nails with the glitter polish. If you want you can paint the tips as well, but I like the accent nails to really pop.

Step 4: Using a nail striper, or a detail brush and paint in the color of your choice, carefully paint stripes on your tips. You can do the lines however you'd like. You can do thin or thick lines. You can even do lines in more than one color. I used a white nail striper, and kept my lines on the thin side. Let your nails dry for a couple minutes before moving on to the next step. 
__________________________________________________


Step 5: Using a nail striper, paint a thin line at the base of your tips. I think this gives your nails a clean and more professional look to them. I used a silver glitter striper. (if you haven't noticed that is my favorite striper to use when i do tips lol) Let your nails dry for a little bit longer before you move to the next step.

Step 6: Apply your favorite top coat, and use a cotton bud or paint brush dipped in nail polish remover to remove any polish that may have gotten on your skin.

That's it, you're done! See how simple that was!

__________________________________________________


You did it, you made it to the end of today's post! I hope you enjoyed today's tutorial, and give it a try! I hope to see that some of you gave it a try. Share your pictures on my Facebook page so I can see how well you did! If you want to stay up to date on what I'm doing, like my Facebook page!
Have a blessed day,


Thursday, April 11, 2013

Gradient glitter nail Tutorial

Hello again, everyone! I have another blog post coming your way! I hope you're ready and excited! Today's post is another nail tutorial. It's a very simple, but doesn't look it. It looks like you spent more time on your nails than you actually did, gotta love that. Are you ready to get into today's tutorial? Let's get into it!


If you want to see how I created this look, keep reading!
__________________________________________________


                                                 Products used:
                                  Base coat: Nail-aid, 3 Minute Artificials
                           Mint green: Rimmel 60 second, Mintilicious
                             Baby blue glitter: Sinful colors, Cinderella 
                             Chunky silver glitter: Pure ice, Dazzle me
                                   Top coat: Sally Hansen, Insta dry
                                          Wedge makeup sponge 
                     Nail polish remover: Onyx, 100% pure acetone  
    paint brush for getting off any polish that got onto my skin

__________________________________________________


Step 1: On clean dry nails, apply your favorite base coat.

Step 2: Choose what nails you want to be your accent nails ,and leave them bare. Paint all of the non-accent nails with any color of your choice. I chose a mint green.
__________________________________________________


Step 3: Apply 1 coat of a sheer glitter on all nails. I chose a baby blue color. It almost makes my mint green look like a Tiffany blue. Before moving to step 4, let your nails dry for a couple minutes.

Step 4: Apply 1 coat of a chunky glitter of your choice, and let it dry for a couple minutes. 
__________________________________________________


Step 5: Apply a second layer of the chunky glitter. I wanted a little of the blue glitter to shine through.

Step 6: Apply a little of the chunky glitter polish to the edge of a wedge makeup sponge. 
__________________________________________________


Step 7: Carefully, sponge the tips of each non-accent nail with the chunky glitter. You'll have to apply glitter to the sponge for each nail. Concentrate the glitter on the very tip, and blend it down a little. So that there is a little gradient of glitter, instead of a harsh line.

Step 8: Apply one coat of your favorite top coat. Then, using either a cotton bud or paint brush dipped in nail polish remover, clean up any nail polish that may have gotten on your skin. That's it, you're finished!

__________________________________________________


I hope you enjoyed this tutorial, and give it a try! It's really easy, and makes you look like a pro. This is one of my go to looks when I don't have time, or just don't feel like going into a detailed look. If you're looking into getting into nail art this is a great starting place. It takes just a couple minutes, and looks amazing. If you try it, I would love to see! You can share your pictures on my Facebook page! If you want to stay up to date on what I'm doing, like me on Facebook. You can also follow me on, twitter, and instagram if you want to see even more. I hope you found this tutorial helpful, and learned something new. 
Have a blessed day, 

Thursday, April 4, 2013

Review on Nail-aid 3 Minute Artificials base/top coat

Hi again, everyone! Today I have another review for you. Today's review will be about another base/top coat I've heard so much about. I've heard "it's amazing, it keeps your polish on for a week without chipping,  it makes your nails strong and healthy". So, of course I tried it out, and I'm ready to tell you what I think about it.


Nail-aid, 3 Minute Artificials is the product I'm reviewing today. I'm actually on my second or third bottle of this. However, that doesn't mean it's the best base coat. It just means it's affordable, and wasn't horrible. I got mine at Ross, for $3 (on a side note, I love Ross). The box says " Harder nails 1 step" "3 Minute artificials, no mess just brush it on" "makes nails hard as gels". I do find that it does make my nails harder, but only while the polish is on. As soon as you take it off your nails are brittle again. Which, for me isn't too big of a deal, because my nails are almost always painted. It's one of the "traditional" pink toned base coats, but the pink color doesn't really show up on your nails. It can be doubled as a top coat, but I wouldn't suggest it. It's not quick drying, and when used as a top coat your nails will take forever to dry. I've never had my nails done in a salon, not gel nails, not artificial nails. So, I really can't compare it to "artificals" as the name suggests. 

In conclusion, do I recommend this product? Sure, if you're looking for a reasonably priced base coat that does make your nails feel stronger, and protects your nails from staining. If you're looking for a base coat that keeps your nail  polish from chipping, then you might want to pass on it. I am still on the search for my perfect base coat, but until I find it, this will do. If you do decide to try it out, I suggest looking for it at Ross. From what I've seen online it runs $7- $8, and I get it for $3 at Ross.

That is my post for the day. I hope you found this review helpful and informative. If you have any questions I didn't answer just leave a comment and I'll let you know what I think. Like me on Facebook if you want to stay up to date with what's going on with me.

In other news, my compact camera I use for some pictures and my videos has just decided to stop working. So, if I can't get it working again I will get a new one as soon as possible but it might be a while. I will keep using my good camera for pictures, but it doesn't do videos. So, if there is a lack of videos in the coming weeks I do apologize in advance. 

Have a blessed day,