Showing posts with label nail art. Show all posts

Wednesday, October 16, 2013

NOTD: Mom's fall gradient glitter nails

Hello again everyone! I have a little bit of a different post today. I decided I would paint my mom's nails tonight(without even talking to her). We are finally almost done with painting the house. So, tonight was perfect for pampering my mom. She has the longest, and strongest nails perfect for nail art!! I'm so jealous! I thought I would do a post on the nails I did for her since I haven't posted in a while(again). I'm hoping to get some fall nail tutorials up soon. Fall is my favorite time of year for nails, so many cute things to do. If you have any questions feel free to ask. If you try these nails out I'd love to see, share them with me on any of my social media sites. I'd love to hear from you. Like me on Facebook to see more from me. I'm also on Instagram and Pinterest, and Twitter . Check out my other blog if you'd like to see non nail related blogs. 
Have a Blessed day,


__________________________________________________

Products used
Sally Hansen - Nail Growth Protein
Orly - Rockin' Rocket
Art Deco - Gold Glitter
Sally Hansen - Insta-Dri
1 cosmetic wedge
__________________________________________________


 I did a simple Gradient glitter design. I already have a tutorial on gradient glitter nails. Check it out here! I went with fall colors. I love the redish color, it has very fine gold glitter in it. That makes for the perfect base for a gradient glitter design.

__________________________________________________


Sunday, September 29, 2013

Life Update!

Hello again everyone! I know it's been a very long time, and for that I'm very sorry :-(. I have had quite a bit going on, and my nails had to be pushed to the side. This will be an update blog, just to let you all know what's been going on. 

First off, For those of you who don't follow me on Instagram, you should. I've been trying to keep everyone on there up to date with what's going on in my life. I post very regularly(more than once a day usually). Those of you who follow me on Instagram already know about this next guy I'm going to talk about. On July 21st we rescued a starving Great Dane. We decided to name him Gabriel, and he has taken up quite a bit of my time recently. If you want to read more on his story check out my mom's blog here. He has quite an extraordinary story, and it makes for an interesting read. You should go check it out if you're interested in Gabe's story. He also has his own Facebook page that you can check out here to see more pictures and get little updates on Gabe from time to time.


Next, We are remodeling our house. So that's also taking up a whole lot of my time. Between the mess from all the moving things around, demolition, and all that kind of stuff I've been being kept quite busy in that aspect as well. We're repainting almost the whole house. So, I haven't been painting my nails much knowing I would just mess them up. Or if I have painted my nails it wasn't anything special enough for a blog post. We only have a couple more rooms to work on and then we'll be done for now. 


Also, I've started dog grooming classes! They are just one day a week, and I only have 4 weeks left. So, they really shouldn't interfere with my blog. Tomorrow is our first class where we will be doing a full body cut, I'm nervous.


Here are a few designs I've done but haven't done a blog post on. Sorry for the quality of most of these pictures. Most of them are just from my cell phone. Just thought I would share them. If you would like to see a post or video on how I did any of these designs just comment down below and let me know!


Now, I hope I will be able to post more often again. I miss sharing my nail designs with you all! I miss having the time to work on my nails. I'm really going to try to get back into the swing of things. I have a couple videos filmed that I will work on getting uploaded to YouTube soon. Leave me some comments on what you would like to see me do! If you have any questions feel free to ask. I'd love to hear from you. Like me on Facebook to see more from me. I'm also on Instagram and Pinterest, and Twitter . Check out my other blog if you'd like to see non nail related blogs. 
Have a Blessed day,


Wednesday, July 17, 2013

Video: Cute Leopard Print Nail Tutorial


Hello again everyone! I'm so happy to finally be bringing you another video! I'm so sorry it has taken me so long to get this video out to you all. I was supposed to have it up over a week ago. However, I threw my back out and have been unable to sit for more then a couple minutes here and a couple minutes there. I am finally beginning to feel better, and getting this video out to you all was my first priority! I hope you enjoy this video, and if you have any ideas on other designs you'd like to see from me next, leave me a comment telling me what you'd like to see. If you have any questions feel free to ask. If you try these nails out I'd love to see, share them with me on any of my social media sites. I'd love to hear from you. Like me on Facebook to see more from me. I'm also on Instagram and Pinterest, and Twitter . Check out my other blog if you'd like to see non nail related blogs. 

Have a blessed day,


You can also go watch it HERE


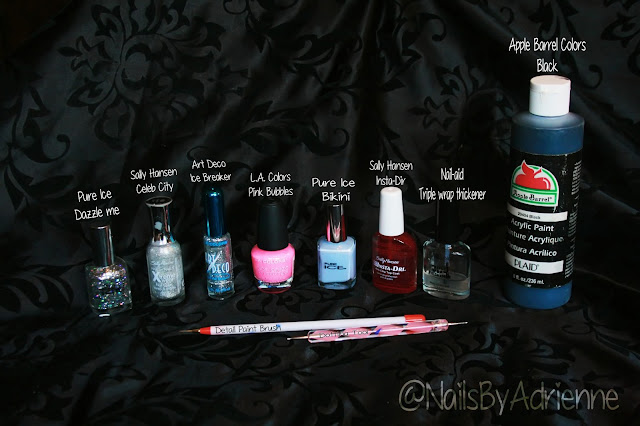
Products Used:

Base coat: Nail-aid, Triple Wrap Thickener

Silver: Sally Hansen, Celeb City
Silver Glitter: Pure Ice, Dazzle Me
Baby Blue: Pure Ice, Bikini
Neon Pink: L.A. Colors, Pink Bubbles
Silver Glitter Striper: Art Deco, Ice Breaker
Top coat: Sally Hansen, Insta-Dri
Black: Apple Barrel Colors, Black
Dotting Tool(get the ones I used here)

Detail Paint Brush(get the ones I used here)


Tuesday, July 9, 2013

NOTD: Cute Blue and Pink Leopard Print Nails


Hello again everyone! I'm sorry I haven't been posting as regularly. I will get back on track! Today I have a NOTD(nails of the day) post for you. I will be posting a video tutorial on this design, Wednesday or Friday. I know this design is a little familiar, but I got such positive feedback from it the first time I decided to record a tutorial on how you can create this design for yourself. You can check the original design I'm talking about here. I changed it up some, just so I wasn't posting the same design twice. However, the technique is the same. So, if you want to learn how to create this design, stay tuned! If you have any questions feel free to ask. If you try these nails out I'd love to see, share them with me on any of my social media sites. I'd love to hear from you. Like me on Facebook to see more from me. I'm also on Instagram and Pinterest, and Twitter . Check out my other blog if you'd like to see non nail related blogs. 
Have a blessed day,


Products Used:
Base coat: Nail-aid, Triple Wrap Thickener

Silver: Sally Hansen, Celeb City
Silver Glitter: Pure Ice, Dazzle Me
Baby Blue: Pure Ice, Bikini
Neon Pink: L.A. Colors, Pink Bubbles
Silver Glitter Striper: Art Deco, Ice Breaker
Top coat: Sally Hansen, Insta-Dri
Black: Apple Barrel Colors, Black
Dotting Tool(get the ones I used here)
Detail Paint Brush(get the ones I used here)


Monday, July 1, 2013

NOTD: Patriotic Firework Nails


 Hello again everyone! I'm sorry today's post is going up so late. With the 4th of July coming up I thought I would go with some patriotic nails. Today's post is just going to be a NOTD(nails of the day). I will work on some videos/tutorials hopefully starting tomorrow. I want to get out at least one patriotic video tutorial up before the 4th. My nail design is very simple, but I love it. I hope you all love it as well. If you try this design out, share it with me on Facebook, Twitter or Instagram, I'd love to see! Like me on Facebook to see more from me. I'm also on Instagram and Pinterest, and Twitter . Check out my other blog if you'd like to see non nail related blogs. 
Have a blessed day,


Products used:
Base coat: Nail-aid, Triple Wrap Thickener
Red: Ruby Deer
Silver glitter: Queen of Beauty
White: Apple Barrel Colors, White
Blue: Delta Ceramcoat, Blue
Top coat: Sally Hansen, Insta-Dri
Detail Paint Brush


Friday, June 28, 2013

Video Tutorial: Purple Lace nails


 Hello again everyone! I'm happy to bring a new video tutorial as I promised in my last blog post. I hope you've all had a great week, and are ready for the weekend. I hope you enjoy my new video! Leave me a comment telling me what kind of video or blog post you'd like to see next! If you have any questions feel free to ask. I'd love to hear from you. Like me on Facebook to see more from me. I'm also on Instagram and Pinterest, and Twitter . Check out my other blog if you'd like to see non nail related blogs.
Have a Blessed day,


 You can also watch my video here!


Products used:
Base coat: Nail-aid, Triple wrap thickener
Purple: Pure Ice, Jail Bait
White: Apple Barrel Colors, White
Top coat: Sally Hansen, Insta-Dri
Get the paint brushes I used here
Get the dotting tools I used here


Wednesday, June 26, 2013

Review: Pure Ice, Jail Bait

Hello again everyone! I hope you're all having a wonderful week. I'm going to be doing another nail polish review. I picked up a couple new Pure Ice polishes the other day. I will reviewing one of them for you today. If you couldn't tell I love Pure Ice polishes. Pure Ice is available in over 100 stunning and on-trend shades! All Pure Ice Nail Polish are free of formaldehyde, toluene and DBP. Plus it's very affordable at just $1.97.  The shade I'm reviewing today is Jail Bait, it's a blue toned light purple. It's quite a unique color. Out of all of my nail polish I didn't have quite this shade. That's why I love Pure Ice, they come out with very unique shades that anyone can afford. I think they are only sold at Walmart, but I'm not sure.


Visit their website here
Follow them on Twitter here
Follow them on Instagram here
Follow them on Pintrest here

 Pure Ice, Jail Bait

Light Blue Based Purple

2-3 coats for opaque coverage

Cream finish
Standard brush
Wears well

 With just one thin coat it was a little streaky, but not bad at all.  It went on very smoothly.

 With 2 thin coats it was perfect. It has worn pretty well, I've had it on for a few days. I'm very hard on my manicures, but it's help up pretty well.

Here it is with my finished manicure. Thought I'd throw in a sneak peek for Friday's blog. I'll have a video tutorial on how I created this design up on Friday. If you want to see how I created this design, look out for my blog post Friday!If you have any questions feel free to ask. I'd love to hear from you. Like me on Facebook to see more from me. I'm also on Instagram and Pinterest, and Twitter . Check out my other blog if you'd like to see non nail related blogs.
Have a Blessed day,

Monday, June 24, 2013

Video: How I Remove My Nail Polish


Hello again everyone! I have another video for you all today! It's a video on how I remove my nail polish. I know I did a blog post a few months ago on this, but I wanted to show you in a video. Go check out that post if you haven't seen it already, here. I know some people add an extra step of wrapping the tips of your nails in foil while the cotton pieces sit on your nail. The foil keeps the nail polish remover from drying. I haven't ever felt the need to add in that extra step, but you might need to if you don't use pure acetone nail polish remover. This method of removing nail polish doesn't waste all the cotton balls. It works for removing glitter polish as well(we all know how annoying glitter polish is to get off).I've been doing this for a few months now, and I don't have to purchase cotton balls or nail polish remover nearly as often now. I hope you found this video helpful. If you have a different way of removing nail polish tell me about it in the comments below! If you have any questions feel free to ask. I'd love to hear from you. Like me on Facebook to see more from me. I'm also on Instagram and Pinterest, and Twitter . Check out my other blog if you'd like to see non nail related blogs.
Have a Blessed day,